Build an Example Angular 10 Form: ngForm/ngModel vs FormGroup/FormBuilder
In this post we will give you information about Build an Example Angular 10 Form: ngForm/ngModel vs FormGroup/FormBuilder. Hear we will give you detail about Build an Example Angular 10 Form: ngForm/ngModel vs FormGroup/FormBuilderAnd how to use it also give you demo for it if it is necessary.
In this tutorial, we’ll learn how to build and work with forms in Angular 10 by creating a simple contact form example.
We’ll see how to use ngForm, ngSubmit and ngModel directives to build a template-based form, and FormGroup and FormBuilder APIs to build a reactive form.
We’ll be using the online IDE from https://stackblitz.com/.
Angular 10 and previous versions provide two methodologies for working with forms:
- The template based method,
- The reactive (or model based) method which makes use of Reactvity and RxJS behind the scenes.
For small projects, there is no better approach, just choose the one most convenient to you!
For bigger projects, it’s recommended to use reactive forms as they scale better. Check out this in-depth article for more information.
Create an Angular 10 App
You can register for an account using your GitHub account and START A NEW APP based on Angular from ready templates. Your Angular project will be based on the latest Angular 10 version.
Building an Angular 10 Template-Based Form
Now, let’s start with the template based approach by building an example Angular 10 form. Let’s do some configurations.
Importing the Angular’ FormsModule
Open the src/app/app.module.ts file and import the FormsModule then we add it to the imports array:
import{NgModule}from'@angular/core';import{BrowserModule}from'@angular/platform-browser';import{FormsModule}from'@angular/forms';import{AppComponent}from'./app.component';@NgModule({imports:[BrowserModule,FormsModule],declarations:[AppComponent],bootstrap:[AppComponent]})exportclassAppModule{}Note: If you are using Stackblitz,
FormsModuleis already imported in the project.
That’s all what you need to add in order to be able to work with template-based forms.
Adding Angular’ ngForm, ngSubmit and ngModel Directives to your Form
Next, open the src/app/app.component.html file and add the following content:
<h1> Template-Based Contact Form Example </h1><form#myform ="ngForm"(ngSubmit)="onSubmit(myform)"><inputtype ="text"name ="fullName"placeholder ="Your full name"ngModel><br/><inputtype ="email"name ="email"placeholder ="Your email"ngModel><br/><prename ="message"placeholder ="Your message"ngModel></pre><br/><inputtype ="submit"value ="Send"></form>We can create our form completly in our Angular template. We first add a template reference variable to the form and assign the ngForm key to it using the #myform = "ngForm" syntax. This will allow us to access the form via the myform reference.
Note: The
#myform = "ngForm"syntax doesn’t create a template based form but only a local templae variable that will allow us to work with the form object. In fact, the form was automatically created when you importedFormsModulein your project .
Next, we bind the ngSubmit event to the onSubmit() method (Which we’ll add to our component next) and we pass in the form object (via the local template variable)
Next, we register the child controls with the form. We simply add the NgModel directive and a name attribute to each element.
According to the docs:
NgFormcreates a top-level FormGroup instance and binds it to a form to track aggregate form value and validation status. This is done automatically whenFormsModuleis imported.
Submitting the Angular 10 Template Form
Next, add the onSubmit() method to the component. Open the src/app/app.component.ts file and add the following code:
import{Component}from'@angular/core';import{NgForm}from'@angular/forms';@Component({selector:'my-app',templateUrl:'./app.component.html',styleUrls:['./app.component.css']})exportclassAppComponent{onSubmit(form:NgForm){console.log('Your form data : ',form.value);}}We passed in the reference to the NgForm object that represents our form to the onSubmit() method and we can use it to access various properties like value which provides a plain JS object that contains the attributes of the form and its data. In this example, we simply print the form value in the console but in a real world situation, we can use it to send the data to a server via a POST request.
You can see all the available methods of NgForm from the docs.
After, adding some CSS styles from this pen, this is a screenshot of our form UI:
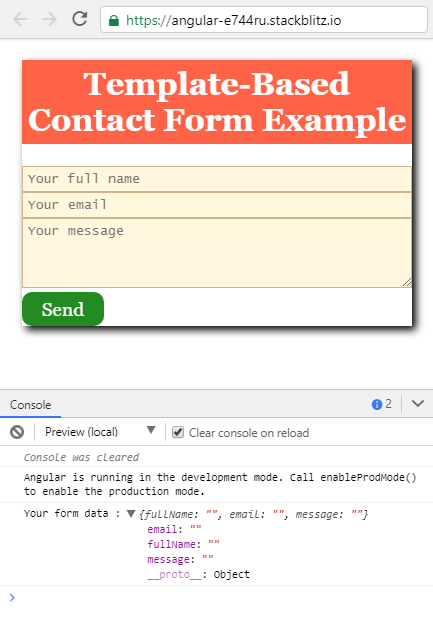
This is the live project:
Building an Angular 10 Reactive Form
After building our Angular contact form with the template-based approach, let’s now see how we can build the same example with the reactive based approach.
Open the src/app/app.module.ts file and import FormsModule and ReactiveFormsModule:
import{FormsModule,ReactiveFormsModule}from'@angular/forms';Next, add them to the imports array of the app module:
// [...]@NgModule({imports:[BrowserModule,FormsModule,ReactiveFormsModule],declarations:[AppComponent],bootstrap:[AppComponent]})exportclassAppModule{}Importing the Angular’ FormGroup and FormBuilder APIs
Next, open the src/app/app.component.ts file and import FormGroup and FormBuilder:
import{FormGroup,FormBuilder}from'@angular/forms';Creating a Form Group and Injecting Angular’ FormBuilder
Next, define the contactForm variable which will be used to hold our form object (instance of FormGroup) and inject FormBuilder via the component constructor:
exportclassAppComponent{contactForm:FormGroup;constructor(privateformBuilder:FormBuilder){}}Building the Form with Angular’ FormBuilder
Next, define a createContactForm() method where we’ll build our form:
createContactForm(){this.contactForm=this.formBuilder.group({fullName:[''],email:[''],message:['']});}We call the group() method of the injected instance of FormBuilder to create a FormGroup of three controls, fullName, email and message. Each control can take an optional array of options and validation rules.
Next, we call the method on the constructor:
constructor(privateformBuilder:FormBuilder){this.createContactForm();}Submitting the Angular 10 Reactive Form
Finally, add the following method which will be called when we submit our form:
onSubmit(){console.log('Your form data : ',this.contactForm.value);}Now, we need to bind this form object to our HTML form. Open the src/app/app.component.html file and add the following code:
<h1> Reactive Contact Form Example </h1><form[formGroup]="contactForm"(ngSubmit)="onSubmit()"><inputtype ="text"name ="fullName"placeholder ="Your full name"formControlName="fullName"><br/><inputtype ="email"name ="email"placeholder ="Your email"formControlName="email"><br/><prename ="message"placeholder ="Your message"formControlName="message"></pre><br/><inputtype ="submit"value ="Send"></form>We use property binding to bind the form using the formGroup property. Next, we use formControlName to sync the FormControl objects in contactForm with the HTML form controls by name. See the docs for more details. Finally, we bind the ngSubmit event of the form to the onSubmit() method.
Here is the live example:
Conclusion
In this tutorial, we’ve built an example contact form in Angular 10 using the template based approach and the reactive (model based) approach. We have seen how to use ngForm, ngSubmit and ngModel directives to build a template-based form, and FormGroup and FormBuilder APIs to build a reactive form.
Hope this code and post will helped you for implement Build an Example Angular 10 Form: ngForm/ngModel vs FormGroup/FormBuilder. if you need any help or any feedback give it in comment section or you have good idea about this post you can give it comment section. Your comment will help us for help you more and improve us. we will give you this type of more interesting post in featured also so, For more interesting post and code Keep reading our blogs